Infrastructure • Sagemaker
Overview
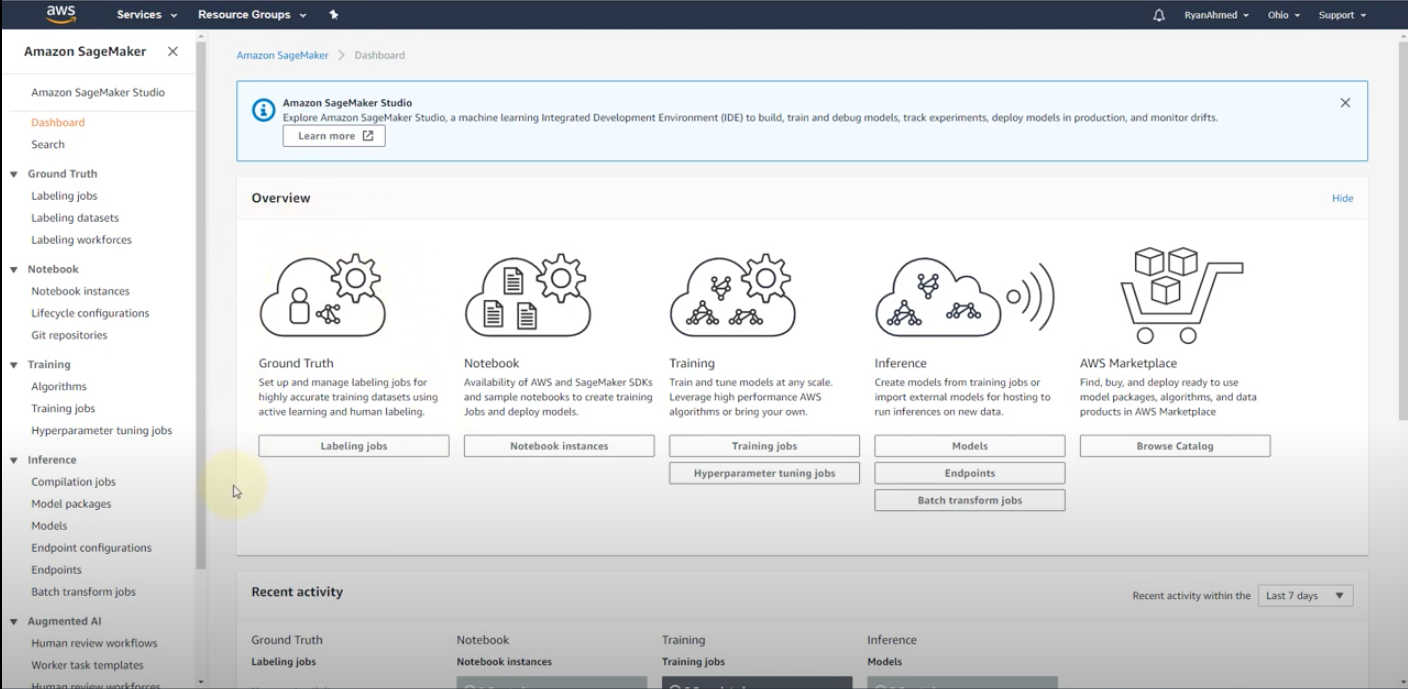
- SageMaker Dashboard: A visual interface that supports the complete machine learning workflow:
- Ground Truth: Facilitates the creation and management of labeling jobs for dataset annotation, which is essential for training accurate models.
- Notebook Instances: Provides Jupyter-based notebooks for exploratory data analysis, data preprocessing, and model experimentation.
- Training and Tuning: Allows for the execution of model training jobs with options for automatic hyperparameter tuning to optimize model performance.
- Inference: Enables the deployment of trained models to managed endpoints for real-time or batch predictions, ensuring scalable and secure model usage.
- AWS Marketplace: Offers a platform to find, test, buy, and deploy third-party machine learning models and algorithms.
- End-to-End ML Workflow Support: Helps in preparing, building, training, tuning, and deploying machine learning models, facilitating a seamless transition from experimental to production environments.
SageMaker Studio
- Integrated Development Environment: SageMaker Studio is an integrated machine learning environment, built on top of JupyterLab, providing all necessary tools and extensions for machine learning development in a single interface.
- Enhanced Productivity: It extends traditional Jupyter Labs by integrating deeper AWS services support, which includes direct access to model training, debugging, and deployment capabilities.
- Collaboration and Version Control: Supports collaboration among team members and integrates with version control systems to manage changes in notebooks and models efficiently.
- All-in-One IDE: SageMaker Studio acts as a comprehensive integrated development environment (IDE) for machine learning, extending beyond just notebooks to include a full suite of tools to manage the entire ML lifecycle.
- Enhanced User Experience: Provides a unified web-based user interface where users can manage all their machine learning components—datasets, notebooks, training jobs, deployments, and more—from a single pane of glass.
- Collaboration and Version Control: Built-in support for collaboration among team members. It integrates with AWS CodeCommit, GitHub, and other version control systems to manage changes in code, notebooks, and models efficiently.
-
Autoscaling and Flexible Compute Options: Unlike standalone notebook instances, Studio offers flexible and scalable compute options that can be adjusted without needing to set up new instances. It provides an easier transition from experiment to production with seamless integration of model building, training, and deployment.
- Amazon SageMaker Studio and SageMaker Notebooks both serve as environments within the SageMaker ecosystem for developing machine learning models, but they have distinct features and use cases. Here’s how they differ:
SageMaker Notebooks
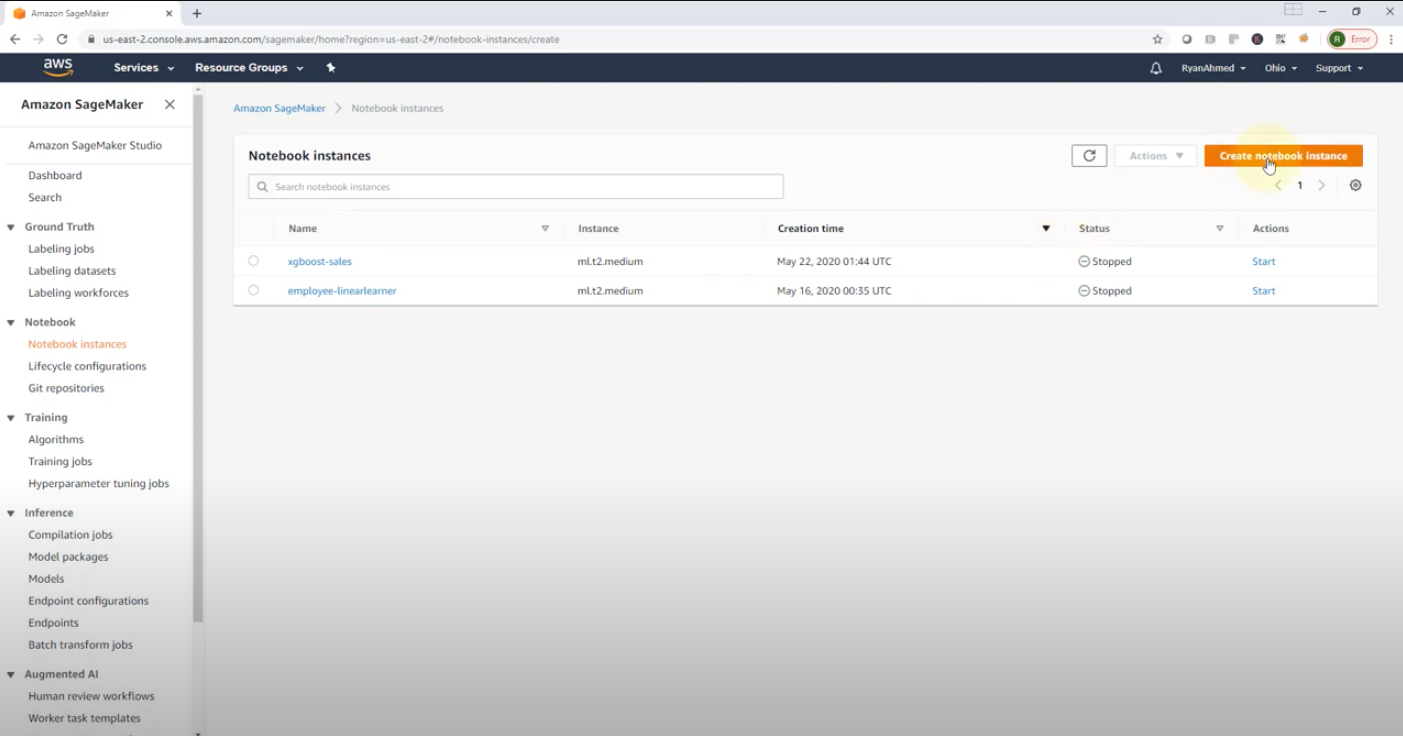
- Purpose: Primarily designed for interactive coding sessions using Jupyter notebooks.
- Functionality: Provides fully managed Jupyter notebook instances that can be quickly spun up and used for model development and data analysis tasks.
- Environment Setup: Users manually set up each notebook instance, including the choice of underlying compute resources and configuration settings.
- Isolation: Each notebook instance operates independently, which can lead to isolated work without automatic integration of version control or collaborative features.
Key Advantages of SageMaker Studio over Notebooks
- Unified Experience: Studio integrates various components of the machine learning workflow into a single interface, reducing the need to switch between different tools and interfaces.
- Enhanced Collaboration: The integrated version control and project sharing capabilities make it easier for teams to work together on complex projects.
- Streamlined Model Lifecycle Management: From data preparation to model deployment, Studio offers tools that facilitate each step, making it easier to bring models from concept to production.
- Advanced Monitoring and Debugging Tools: Studio includes tools like SageMaker Debugger and SageMaker Model Monitor which are directly integrated into the environment, providing deep insights and alerts on model performance and training issues.
- So while SageMaker Notebooks is suitable for individual projects or specific tasks requiring notebook instances, SageMaker Studio provides a more holistic and integrated approach, suitable for full-scale machine learning development and team collaboration.
Labeling Job
- Data Specification: Define the type of data that requires labeling, such as images, text, or tabular data. SageMaker Ground Truth supports various data types and labeling tasks including image classification, text annotation, and more.
- IAM Role and Workflow: Specify an IAM role with permissions to access necessary resources. The labeling workflow can be automated, involving human annotators from Amazon Mechanical Turk, private workforces, or vendor-managed workforces.
- Labeling Interface: SageMaker provides pre-built or customizable labeling interfaces. For tasks like image labeling, interfaces for bounding box, segmentation, or simple classification are available.
- Automation and Efficiency: Automated data labeling using machine learning models (active learning) to pre-label data and assist human labelers, improving efficiency and reducing overall labeling time.

SageMaker SDK
- Comprehensive Toolset: The SageMaker Python SDK simplifies machine learning workflows by providing high-level abstractions for different stages of the machine learning lifecycle—from data preprocessing and model training to deployment.
- Ease of Use: Streamline interactions with SageMaker resources like training jobs, model deployment, and experiment tracking directly through Python code, making the process more intuitive for developers and data scientists.
- Integration and Extension: Works seamlessly with popular Python libraries and AWS services, enhancing functionality while allowing custom extensions and modifications to fit specific project needs.
SageMaker Containers
- Managed Environment: AWS manages a variety of containers tailored for different machine learning frameworks like TensorFlow, MXNet, PyTorch, and Scikit-Learn. This managed service simplifies the deployment process and ensures compatibility and optimization.
- Scalability and Maintenance: Automatically handles the scaling of container instances based on the workload requirements without manual intervention in container management or orchestration.
- Pre-built and Custom Containers: Offers a range of pre-built containers while also allowing users to create custom Docker containers for specialized requirements.
- Seamless Integration: Integrated with SageMaker’s model training and deployment services, facilitating straightforward workflows from model development to production without the need for deep containerization expertise.
Step 1: Set Up Your SageMaker Session and Load the Model
First, ensure you have the AWS SDK boto3 and sagemaker Python libraries installed. You can install them via pip if they’re not already installed:
pip install boto3 sagemaker
- Now, you can begin by setting up your SageMaker session and loading your model:
import sagemaker
from sagemaker import get_execution_role

# Initialize a SageMaker session
sagemaker_session = sagemaker.Session()

# Get the role for deploying the model
role = get_execution_role()

# Location of your model artifacts in S3
model_data = 's3://<your-bucket-name>/path/to/model/model.tar.gz'

# Name of the Docker container image for inference
# For example, using a pre-built SageMaker TensorFlow image
from sagemaker.tensorflow import TensorFlowModel

model = TensorFlowModel(model_data=model_data,
                        role=role,
                        framework_version='2.3',  # Specify your framework version
                        sagemaker_session=sagemaker_session)
Step 2: Deploy the Model to an Endpoint
Next, deploy your model to a SageMaker endpoint. You can specify the type of instance that the model should be deployed on:
# Deploy the model to an endpoint
predictor = model.deploy(initial_instance_count=1,
                         instance_type='ml.m5.large',
                         endpoint_name='my-model-endpoint')
Step 3: Make Real-Time Inference Requests
Once the model is deployed, you can use the endpoint to make real-time predictions:
# Example: predict with data
data = {'instances': [1.0, 2.0, 5.0]}  # Adjust the format based on your model's input schema
response = predictor.predict(data)
print(response)
Step 4: Clean Up Resources
To avoid incurring unnecessary charges, remember to delete the endpoint when you’re done:
# Delete the endpoint
sagemaker_session.delete_endpoint(endpoint_name='my-model-endpoint')
Deploying models in Amazon SageMaker is a streamlined process that involves several key steps. The service is designed to simplify the deployment of machine learning models into production environments, providing scalable and robust hosting services with minimal setup. Here’s a detailed breakdown of how model deployment works in SageMaker:
Model Deployment Process in SageMaker
-
Model Training: First, you train your model using SageMaker. You can either use the built-in algorithms provided by SageMaker or your custom algorithms. The training process results in a model artifact, typically stored in Amazon S3.
-
Create a Model: After training, you create a model in SageMaker by specifying the location of the trained model artifacts and the Docker container image to be used for inference. This container image contains all the necessary code to execute the model predictions.
- Hosting Configuration: You configure the hosting services for your model. This involves:
- Endpoint Configuration: Define an endpoint configuration where you specify the type and quantity of the ML compute resources (like instance types and number) that you need to deploy your model.
- Auto Scaling: Optionally, you can set up auto-scaling policies for the endpoint to automatically adjust the number of instances in response to the workload.
-
Create an Endpoint: Deploy the model to an endpoint. SageMaker launches the necessary ML compute instances and deploys the model. This endpoint acts as the HTTP(S) interface to interact with the model.
-
Real-Time Inference: Once the endpoint is active, client applications can make real-time inference requests to the endpoint. Each request is processed by the model, and predictions are returned synchronously.
-
Batch Transform: For batch predictions, SageMaker offers a batch transform feature where you can run predictions on large datasets without maintaining a persistent endpoint. This is ideal for scenarios where you need to make predictions infrequently or on a schedule.
- Monitoring and Management: After deployment, SageMaker provides tools to monitor the performance of your model and manage the lifecycle of your endpoints. This includes monitoring metrics such as latency, throughput, and error rates. SageMaker also allows you to update models or endpoint configurations without downtime.
Key Features
- Model A/B Testing: SageMaker supports A/B testing of models by directing traffic to multiple model variants at an endpoint, allowing you to experiment with different models under real-world conditions.
- Endpoint Security: Security is managed through AWS Identity and Access Management (IAM) roles, encryption using AWS Key Management Service (KMS), and network isolation using VPC endpoints.
- Integration: SageMaker endpoints can easily integrate with other AWS services and applications, enabling a seamless flow from data sources to prediction consumption.
This deployment process highlights SageMaker’s capability to manage the complete lifecycle of machine learning models, from training through to scalable and secure deployment, making it an effective platform for operationalizing machine learning.